Embroidery can make an ordinary garment look premium — or make a good garment look badly branded. See our guide: embroidery vs screen print vs DTG compared.
The difference usually comes down to four things: digitising, stitch type, placement and fabric compatibility.
A logo that works perfectly on a heavyweight sweatshirt can pucker on a lightweight polo. A 3D puff design that looks strong on a cap may lose definition on a soft T-shirt. See our guide: embroidery or screen printing for corporate uniforms.
That is why choosing embroidered clothing UK suppliers should involve more than comparing embroidery prices.
The right supplier needs to understand the garment underneath the logo.
Contents
- 1. Post Summary
- 2. Why Embroidery Remains a Premium Decoration Choice for Clothing Brands
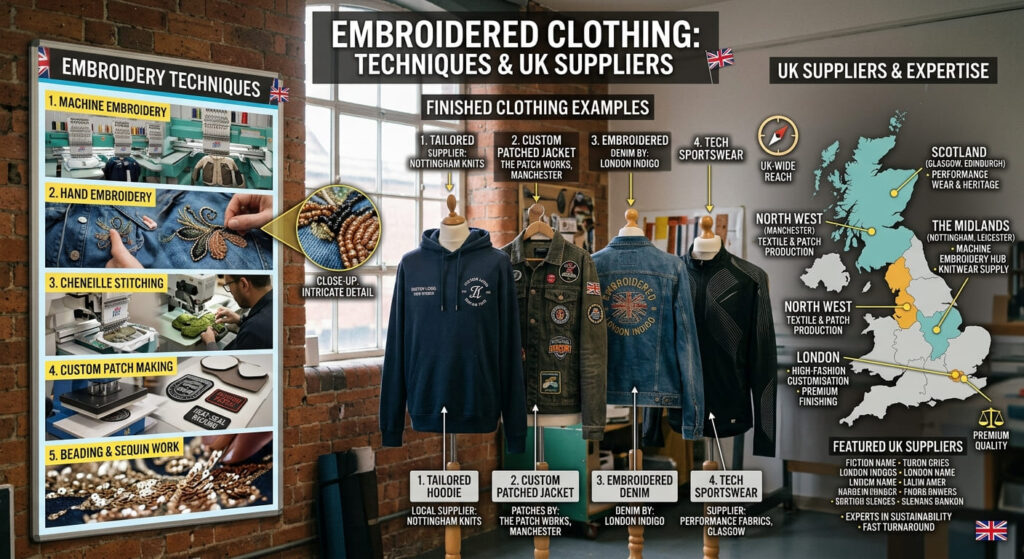
- 3. Embroidery Techniques for Clothing — Full Guide
- 4. Satin Stitch vs Fill Stitch
- 5. Which Embroidery Technique Fits Your Garment?
- 6. Three Common Embroidery Routes
- 7. Interactive Embroidery Technique Finder
- 8. Technique & Garment Fit
- 9. From Logo File to Finished Embroidery
- 10. Digitising — The Essential First Step
- 11. What Is Embroidery Underlay?
- 12. What Is Pull Compensation?
- 13. Embroidery Stitch Count — Why It Matters
- 14. Embroidery Placement Options for Garments
- 15. Left-Chest Embroidery
- 16. Sleeve Embroidery
- 17. Back Embroidery
- 18. Cap Embroidery
- 19. How Embroidery Performs Across Different Fabric Types
- 20. Heavyweight Hoodies and Sweatshirts
- 21. Polo Shirts
- 22. Fleece
- 23. Lightweight T-Shirts
- 24. Stretch Activewear
- 25. Waterproof and Technical Garments
- 26. Embroidery Backing and Stabiliser
- 27. Thread Choice and Colour
- 28. Why a Sew-Out Should Be Approved
- 29. MOQ and Pricing for Embroidered Clothing UK
- 30. One Position vs Multiple Positions
- 31. How to Brief a UK Embroidery Clothing Supplier
- 32. Artwork Requirements for Embroidery
- 33. How to Choose a UK Embroidery Supplier
- 34. Common Embroidery Mistakes
- 34.1. 1. Sending Artwork Without Finished Dimensions
- 34.2. 2. Using Too Much Detail at Small Size
- 34.3. 3. Using the Same Digitised File on Every Fabric
- 34.4. 4. Making Embroidery Too Dense
- 34.5. 5. Approving a Digital Mock-Up Instead of a Sew-Out
- 34.6. 6. Choosing 3D Puff for Fine Detail
- 34.7. 7. Ignoring Garment Performance
- 35. How Silk Routes Handles Embroidered Clothing Orders
- 36. FAQ
- 37. Embroidery Quality Starts Before the Machine Runs
Post Summary
Embroidery is particularly effective for durable, premium-looking garment branding
Flat embroidery is the most versatile technique
3D puff works best on suitable structured surfaces
Chain stitch creates a more decorative, heritage-style finish
Patches allow complex designs to be produced separately from the garment
Digitising converts artwork into machine instructions and strongly affects quality
Stitch density must suit both the design and the garment
Placement should be approved in actual dimensions, not from a screen mock-up alone
Lightweight, stretch and waterproof fabrics need additional care
MOQ and cost depend on stitch count, design size, setup, garment and order quantity
The supplied brief covers flat embroidery, 3D puff, chain stitch, appliqué/patch work, digitising, placement, fabric compatibility, MOQ and supplier briefing.
Why Embroidery Remains a Premium Decoration Choice for Clothing Brands
Embroidery adds the design with thread rather than laying a printed graphic over the garment surface.
That gives it a different character.
Brands often use embroidery for:
Polo shirts
Hoodies
Sweatshirts
Jackets
Workwear
Corporate uniforms
Caps
Beanies
Bags
It works particularly well when the objective is a clean, permanent-looking identity.
But embroidery is not automatically better than printing.
It becomes the better choice when the garment, artwork and intended appearance suit stitched decoration.
A large photographic design on the front of a T-shirt is usually a poor embroidery brief.
A small corporate logo on a heavyweight polo can be an excellent one.
Silk Routes Manufacturing Team: Choose the decoration technique around the garment and artwork. Do not force every logo into embroidery simply because embroidery is perceived as premium.
Embroidery Techniques for Clothing — Full Guide
| Technique | Appearance | Best Use | Main Limitation |
|---|---|---|---|
| Flat embroidery | Clean, conventional stitching | Logos, text, uniforms | Heavy coverage can become stiff |
| Satin stitch | Smooth raised columns | Lettering, borders | Unsuitable for very wide areas |
| Fill stitch | Dense filled area | Larger shapes | High stitch count |
| 3D puff | Raised dimensional finish | Caps, bold lettering | Fine detail can disappear |
| Chain stitch | Decorative looped effect | Heritage/fashion designs | Different visual character |
| Appliqué | Fabric plus stitching | Large graphics | Extra cutting/material |
| Embroidered patch | Design made separately | Badges, workwear | Needs attachment stage |
Flat Embroidery
Flat embroidery is the standard starting point for most garment branding.
The stitches sit relatively close to the garment surface.
It works particularly well for:
Company logos
Staff uniforms
Polo shirts
Hoodies
Jackets
Chest branding
Flat embroidery can combine different stitch types within one design.
For example, lettering may use satin stitching while larger filled areas use fill stitches.
3D Puff Embroidery
3D puff embroidery places foam beneath selected stitching.
The stitching covers and compresses the foam, creating a raised result.
It is often seen on:
Baseball caps
Snapbacks
Heavyweight headwear
Bold sweatshirt logos
The design needs to be suitable.
Tiny text, narrow gaps and detailed shapes do not generally translate well into a strong puff effect.
3D puff should therefore be designed as 3D embroidery from the beginning rather than simply applying foam beneath an existing flat-embroidery file.
Chain Stitch
Chain stitch creates linked loops that resemble a chain.
It has a distinctly different appearance from standard machine embroidery.
It can suit:
Varsity-inspired garments
Heritage clothing
Workwear-inspired collections
Decorative lettering
Vintage-style branding
The attraction is visual character rather than maximum fine-detail reproduction.
Appliqué and Patch Embroidery
Appliqué combines another piece of fabric with embroidery.
Instead of filling a very large design entirely with thread, a fabric section can create the main body while embroidery secures and outlines it.
This can be useful for:
College-style letters
Sportswear
Jackets
Sweatshirts
Large logos
Embroidered Patches
Patches are produced separately and attached later.
They can be:
Sewn on
Heat applied where appropriate
Combined with another attachment method
Patches give brands flexibility because the decoration does not need to be embroidered directly onto every garment.
Satin Stitch vs Fill Stitch
These are not competing decoration methods in the same way as embroidery versus screen printing. See our guide: UK screen printing prices.
They are embroidery construction tools.
Satin Stitch
Satin stitch uses stitches across a relatively narrow shape.
It works well for:
Letters
Borders
Narrow logo elements
It creates a smooth finish.
Fill Stitch
Fill stitching covers larger areas.
It may be used for:
Large logo shapes
Background sections
Solid graphic areas
The larger the filled area, the more thread and machine time can be required.
This is one reason embroidery price can vary dramatically between two logos of similar outside dimensions.
Related reading: custom T-shirt manufacturing · hoodie and sweatshirt production
Which Embroidery Technique Fits Your Garment?
Interactive guide for choosing flat embroidery, 3D puff, chain stitch, appliqué or patches.
Three Common Embroidery Routes
Best for polos, hoodies, jackets, workwear and standard logos.
Best for bold cap logos and large lettering where a raised finish is wanted.
Best for heritage, varsity, workwear-inspired and decorative branding.
Interactive Embroidery Technique Finder
Technique & Garment Fit
| Technique | Best Fit | Main Check |
|---|---|---|
| Flat embroidery | Polos, hoodies, jackets | Digitising + density control |
| 3D puff | Caps, bold logos | Puff-specific digitising |
| Chain stitch | Heritage / varsity | Artwork compatibility |
| Appliqué | Large letters / graphics | Fabric + stitch coordination |
| Patch | Badges / flexible branding | Attachment method |
From Logo File to Finished Embroidery
Digitising — The Essential First Step
An embroidery machine does not simply open a normal logo file and start sewing it perfectly.
Artwork needs to be converted into embroidery instructions.
That process is called digitising.
Digitising determines things such as:
Stitch type
Stitch direction
Stitch sequence
Density
Underlay
Pull compensation
Start and stop points
Thread colour sequence
The digital embroidery file tells the machine how to construct the design.
Good Digitising Is More Than Tracing
A poor digitised file can cause:
Puckering
Gaps
Distorted lettering
Excessive density
Thread breaks
Poor edges
Excessive garment stiffness
The digitiser needs to understand how thread and fabric interact.
What Is Embroidery Underlay?
Underlay stitches are laid underneath visible embroidery.
They can help:
Stabilise the fabric
Support top stitching
Improve edges
Control distortion
The right underlay depends on:
Fabric
Design
Stitch type
Density
A heavyweight sweatshirt and a lightweight polo may need different settings even when carrying the same logo.
What Is Pull Compensation?
Embroidery stitches can pull fabric and thread inward.
Digitising can compensate for this movement.
Without suitable compensation, elements may:
Become too narrow
Leave gaps
Misalign
Small lettering makes these problems particularly obvious.
Embroidery Stitch Count — Why It Matters
Embroidery stitch count refers to the number of stitches required to produce the design.
It is influenced by:
Logo dimensions
Coverage
Detail
Stitch type
Density
Two logos measuring the same width can have very different stitch counts.
For example:
Logo A: simple company name.
Logo B: same dimensions but with a fully filled background, icon and multiple detailed elements.
Logo B may require considerably more machine time.
That is why outside dimensions alone are not enough for an accurate embroidery quotation.
Embroidery Placement Options for Garments
Placement affects both branding impact and production difficulty.
| Placement | Common Garment | Main Consideration |
|---|---|---|
| Left chest | Polo, shirt, jacket | Most common corporate position |
| Right chest | Workwear, jackets | Balance with other branding |
| Centre chest | Sweatshirt, T-shirt | Logo dimensions |
| Sleeve | Polo, jacket, hoodie | Narrow working area |
| Back neck | T-shirt, sweatshirt | Small-scale branding |
| Upper back | Workwear, jacket | Larger visibility |
| Full back | Jackets/workwear | High stitch area |
| Cap front | Caps | Curved surface |
| Beanie front | Knit headwear | Stretch and rib structure |
Left-Chest Embroidery
Left-chest embroidery is one of the most common corporate branding placements.
It works because it is:
Visible
Professional
Relatively compact
Compatible with many garments
But placement should still be measured carefully.
A logo positioned well on a men’s large polo may look different on a smaller garment.
Sleeve Embroidery
Sleeves provide useful secondary branding.
Common uses include:
Sponsor logo
Web address
Sub-brand
Certification mark
Small emblem
Machine access can be more restricted than on a flat chest area.
Back Embroidery
Larger embroidery can be used on jacket backs.
However, increasing the design size can substantially increase:
Stitch count
Machine time
Garment stiffness
Production complexity
Large solid areas should therefore be reviewed carefully.
Cap Embroidery
Caps need separate consideration because the surface is curved and structured.
The embroidery may cross:
Front panels
Centre seams
3D puff is particularly associated with cap branding.
The digitised file should be created for the cap rather than assuming the same settings used on a sweatshirt will work.
How Embroidery Performs Across Different Fabric Types
| Fabric/Garment | Suitability | Main Production Issue |
|---|---|---|
| Heavy sweatshirt | Excellent | Density still needs control |
| Polo piqué | Very good | Fabric texture |
| Fleece | Good | Stitches can sink into pile |
| Softshell | Good | Needle/performance considerations |
| Lightweight jersey | More difficult | Puckering |
| Stretch activewear | Specialist care | Distortion |
| Waterproof shell | Requires care | Needle penetration |
| Knitted beanie | Good with preparation | Stretch + rib movement |
Heavyweight Hoodies and Sweatshirts
These provide a stable surface for many embroidery designs.
That does not mean unlimited stitch density is sensible.
A very dense logo can still become:
Heavy
Rigid
Uncomfortable
Polo Shirts
Piqué fabric has texture.
Small details can be affected by that surface.
The correct combination of:
Stabiliser
Underlay
Density
helps produce a cleaner result.
Fleece
Fleece has a raised surface.
Fine stitches can disappear into the pile.
Techniques may include appropriate underlay or other embroidery preparation to create a more stable base.
Lightweight T-Shirts
Embroidery can be applied to T-shirts, but lightweight jersey requires restraint.
A large dense logo can:
Pull the fabric
Pucker
Feel heavy
For large designs, printing may be more appropriate.
Stretch Activewear
Stretch fabrics move significantly.
An embroidery specification needs to manage that movement.
A highly rigid embroidered area on a garment designed to stretch can affect both:
Comfort
Appearance
Waterproof and Technical Garments
Embroidery needles penetrate the garment.
That matters on garments whose performance depends on barriers or coatings.
The effect of decoration should be considered as part of the product specification rather than added casually after production.
Embroidery Backing and Stabiliser
Backing helps support fabric during embroidery.
The type depends on the garment.
Possible considerations include:
Tear-away backing
Cut-away backing
Specialist stabilisers
The correct choice depends on fabric structure and design density.
A stretch garment generally needs different support from rigid workwear.
Thread Choice and Colour
Embroidery thread contributes to:
Colour
Shine
Durability
Appearance
The brand should specify colour carefully.
Do not rely entirely on how colours appear on a monitor.
Where colour accuracy matters, approve thread against:
Physical brand references
Approved thread charts
Actual sew-outs
Why a Sew-Out Should Be Approved
A digital mock-up shows placement and approximate appearance.
A sew-out shows what the embroidery actually does.
Before bulk production, assess:
Letter clarity
Thread colour
Density
Edges
Puckering
Size
Overall finish
For critical branded orders, the physical result matters more than the screen preview.
MOQ and Pricing for Embroidered Clothing UK
There is no useful universal embroidery MOQ.
Requirements vary by supplier and project.
| Pricing Factor | Effect on Production |
|---|---|
| Stitch count | More stitches increase machine time |
| Logo size | Can increase stitch count |
| Number of positions | Each location adds operations |
| Thread colours | Can increase changes/setup |
| Garment type | Affects loading and handling |
| Quantity | Influences production efficiency |
| Digitising | Initial artwork preparation |
| Special techniques | Puff/patch work adds complexity |
The brief requests UK embroidery pricing statistics and MOQ benchmarks.
I have not inserted fixed 2026 prices without a current verified source.
A useful quote should separate, where applicable:
Garment cost
Digitising/setup
Embroidery
Additional positions
Special techniques
Packaging
One Position vs Multiple Positions
A polo with one embroidered chest logo is a different production job from a garment carrying:
Chest logo
Sleeve logo
Back logo
Each position requires additional handling.
A buyer should therefore request a quote based on the complete branding specification.
How to Brief a UK Embroidery Clothing Supplier
Provide the supplier with:
Garment type
Fabric composition
Garment colour
Order quantity
Size breakdown
Logo file
Finished embroidery dimensions
Placement
Thread colours
Technique
Number of embroidery positions
Special requirements
Packaging requirements
Delivery requirement
Do not send only:
“Please embroider our logo on 100 polos.”
The supplier still has to determine too many important variables.
Brands planning embroidered clothing and uniform orders can review our clothing manufacturing services before production.
Artwork Requirements for Embroidery
A clean vector logo can help the digitising process, but digitising is still separate.
Good source artwork should make it easy to identify:
Shapes
Lettering
Colour breaks
Design hierarchy
Very small details may need simplification.
The embroidered version of a logo does not always need to reproduce every feature of the print version.
How to Choose a UK Embroidery Supplier
Do not choose purely from a price list.
Ask to see relevant work.
Check:
Garment type
Logo complexity
Edge quality
Letter clarity
Reverse-side finish
Placement consistency
For repeat uniform or clothing orders, consistency matters as much as the first sample.
Common Embroidery Mistakes
1. Sending Artwork Without Finished Dimensions
Why it happens: The logo looks correctly proportioned on screen.
Why it fails: The supplier has no confirmed physical size.
Fix: Specify width or height in actual measurements.
2. Using Too Much Detail at Small Size
Why it happens: Brands want the embroidered logo identical to the master artwork.
Why it fails: Tiny gaps and text can close up.
Fix: Create an embroidery-appropriate version where necessary.
3. Using the Same Digitised File on Every Fabric
Why it happens: The artwork is identical.
Why it fails: Different fabrics need different stabilisation and sometimes different embroidery settings.
Fix: Test the design on the actual garment.
4. Making Embroidery Too Dense
Why it happens: More thread is mistaken for higher quality.
Why it fails: Excessive density can cause stiffness, puckering and thread problems.
Fix: Let density match the fabric and design.
5. Approving a Digital Mock-Up Instead of a Sew-Out
Why it happens: Mock-ups are faster.
Why it fails: They do not reveal fabric interaction.
Fix: Approve a physical sample or production-equivalent sew-out.
6. Choosing 3D Puff for Fine Detail
Why it happens: The raised finish looks premium.
Why it fails: Small elements may lose definition.
Fix: Reserve puff for bold shapes and lettering.
7. Ignoring Garment Performance
Why it happens: Decoration is treated as the final step.
Why it fails: Needle penetration or stiff stitching may affect technical fabrics.
Fix: Consider decoration during product development.
How Silk Routes Handles Embroidered Clothing Orders
Embroidery works best when the decoration specification is built into the garment order.
Silk Routes can help coordinate:
Garment selection
Logo preparation
Digitising requirements
Embroidery technique
Thread colour
Placement
Sampling
Bulk decoration
Quality-control requirements
This allows the embroidery and garment to be assessed together rather than as two unrelated purchases.
You can learn more about our manufacturing approach on the About Silk Routes page.
FAQ
No Google People Also Ask questions were supplied for this article, so the questions below are practical buyer FAQs rather than claimed Google PAA data.
What is the best embroidery technique for clothing?
For general logos and corporate clothing, flat embroidery is usually the most versatile starting point.
Before choosing a technique, assess at least 4 factors: garment fabric, logo size, detail and desired finish.
What is the difference between flat embroidery and 3D puff embroidery?
Flat embroidery sits closer to the garment surface, while 3D puff uses foam to create raised areas.
Think of them as 2 different visual constructions, not simply different quality levels.
What is embroidery digitising?
Digitising converts artwork into instructions that an embroidery machine can follow.
At minimum it controls 5 important elements: stitch type, direction, sequence, density and underlay.
Can any logo be embroidered on clothing?
Most logos can be adapted, but not every design should be reproduced unchanged.
Very small text, thin lines and tiny gaps are 3 common elements that may need simplification.
What should I send to a UK embroidery supplier for a quote?
Send the garment, quantity, logo, embroidery size, placement and technique.
Those 6 details create a much more meaningful starting specification than artwork alone.
Embroidery Quality Starts Before the Machine Runs
Embroidery quality is not created by the embroidery machine alone.
It starts with the artwork.
Then comes digitising.
Then fabric.
Then stabilisation.
Then placement.
Then the actual sewing.
If those decisions work together, embroidery can give uniforms, fashion garments and branded clothing a clean, durable identity.
If they do not, adding more stitches will not rescue the result.
When comparing embroidered clothing UK suppliers, ask to see the physical embroidery rather than only the digital mock-up.
Ask how the file was digitised.
Ask whether the actual garment will be tested.
Ask how placement is controlled across sizes.
Those questions reveal far more about production capability than the embroidery price alone.
For broader specialist clothing production guidance, see our Specialist Clothing Manufacturers UK guide.

Pingback: Embroidery vs Screen Print vs DTG: Which Method? [2026]
Pingback: Screen Printing Services UK: Prices & Guide [2026]